Note: unlike the Windows binary package, the Linux does not contain the library dependencies
3.2 Installation from binary for FreeBSD
Port and package coming soon. Use installation from source for now.3.3 Installation from binary for Windows
There are two binary packages for Windows. A self installer and a standalone zip-archive.The zip-archived package is useful for a portable storage device when you may need to run the program on several systems. To install extract to the directory you want to install to.
The self installer is straight forward. Double click the executable and follow the prompts.
4 How it works
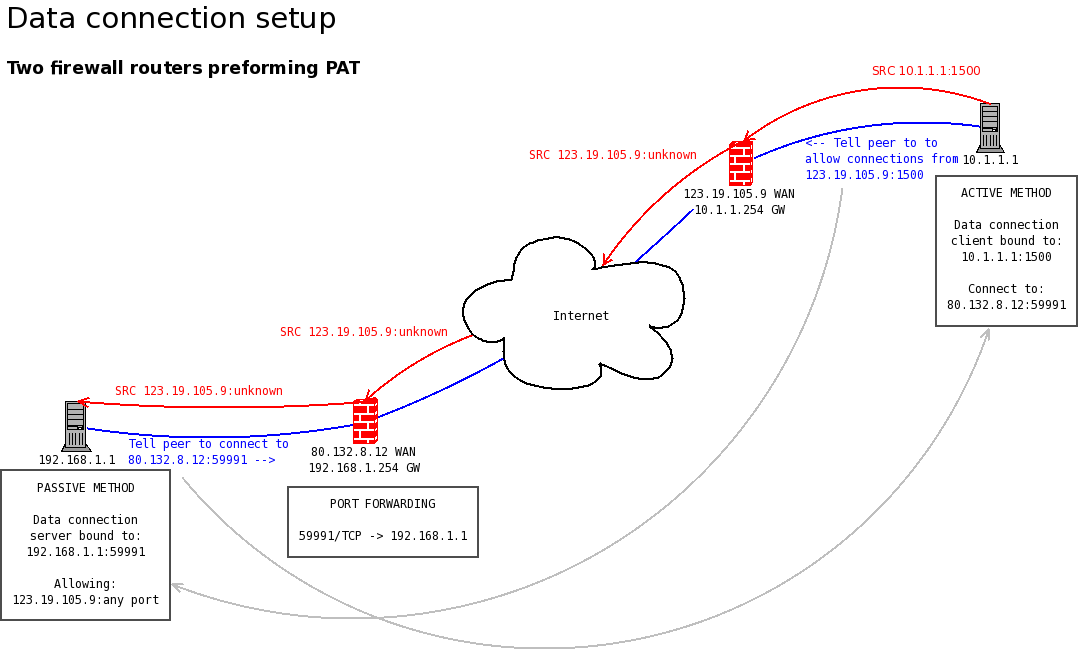
Secure Dispatch uses out-of-band control (different channels for control and data). This control mechanism is the same concept FTP makes use of. In Secure Dispatch when a control connection is established this endpoint pair are known as peers. They are peers as they are both equal in that they handle the same control messages. Each peer can have as many incoming and outgoing data transfers as their system will support. When a data transfer is to be suggested to a peer, they must decide whether to use a passive connection method and an active connection method. The peer who receives the request will have to setup the connection method using the method the peer did not select, if they wish to accept the transfer. Alternatively they could decline it to let the peer know they don't want this file.
The following describes how connection methods are used to initiate a data connection A peer setting up a data transfer with an active connection method requires them to specify the local address to bind to for the source address and the address that the peer will see as the source address for this connection (could be translated).
A peer suggesting a data transfer with a pasive connection method requires they specify an address the peer should connect to reach the data server. Along with this they must select a started data server for the TCP connection that will be used to send the file data through. This server will only allow the address specified by the peer (active) which describes the peers source address relative to the server.
Note: A lot of routers are also PAT enabled for example ADSL routers. This means they translate both network layer address's and transport layer ports as a packet traverses public and private networks. While the IP address is usually easy to predict the port number is not. In these situations the peer using the active connection method can choose to allow any port, but the IP will still be restricted.
Below is an example of this scenario
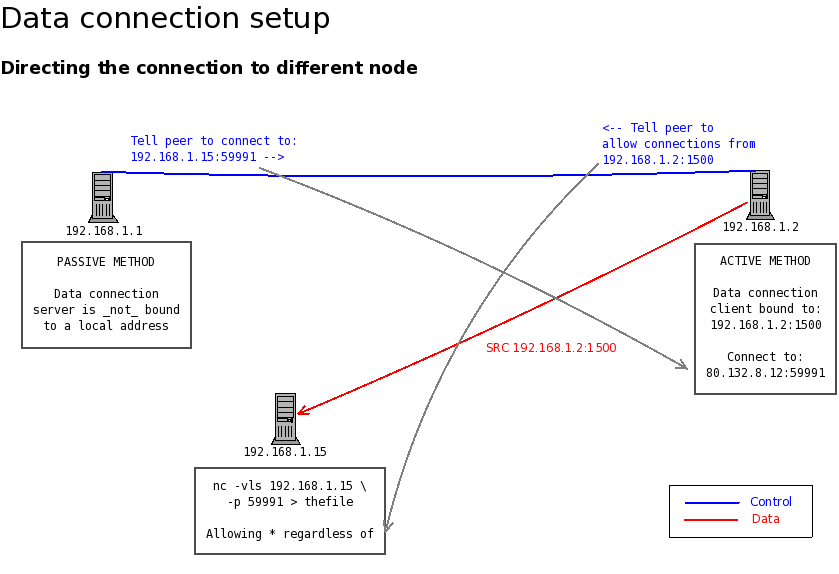
There is one difference with passive mode on an incoming transfer. This is the option to not associate a data transfer with a started data server, but to direct the peer to connect to a different server of their choice (not having to be on the same system).
Below is an example of this configuration
5 How to use it
5.1 Control connections
To establish a control connection you must connect to a control server or start a control server that will accept connection from a client.5.1.1 Starting a control server
- Open the Start Server dialog. File -> Server -> Start Server
- Change settings for the server
- Enter the local address information to bind the server to
- Optionally enable and configure the SSL settings
- Select Control as the server type
- Click Start Server
5.1.2 Connecting to a control server
- Open the Connect dialog. File -> Client -> Connect
- Change settings for the connection
- Enter the remote address information of the data server
- Optionally enable and configure the SSL settings
- Click Connect
5.1.3 Closing a control connection
- Open the Peers dialog by clicking the Peers icon on the main window
- Select the peer in the top-left corner
- Click Disconnect Peer
5.2 Data transfers
A data transfer is coordinated over the control connection, but requires a new connection for the actual file data stream. Therefore, once again a server and a client must be configured to establish a circuit for the file data stream through. This configuration is simplified with the control connection as each peer only has to specify their own network configuration and have little worry about their peers. For more information about how the connection methods work see the 'How it works' section.5.1.1 Starting a data server
See 'Starting a control server'. Only thing you to change is the server type from Control to Data- Open the Start Server dialog. File -> Server -> Start Server
- Change settings for the server
- Enter the local address information to bind the server to
- Optionally enable and configure the SSL settings
- Select Data as the server type
- Click Start Server
5.1.2 Suggesting a data transfer to a peer
- Open the Suggest File(s) dialog by clicking the Add icon on the main window
- Select the file(s) that you want to send from the file chooser, then click the Add file button to add it to the list.
- Setup the connection method of your choice. See 'Connection method setup'
- Select the peer to suggest the file to
- Click Suggest
5.1.3 Configuring an incoming data transfer
- Open the Incoming Transfer Settings dialog. Right click the data transfer in the top list in the main window and select Preferences in the popup menu.
- Change the following settings
- Setup the connection method the peer has chosen for you. See 'Connection method setup'
- Browse the directory you wish to save the incoming file.
- Optionally scan the directory specified above to see if you already have the incoming file. If it, exists it will update the resume position to the next pending byte to resume the file download. Otherwise, the file position will be set to 0.
5.1.4 Connection method setup
Active connection method
- Change the following settings
- Enter the local address to bind the connection socket to
- Enter the address to recipient will see by the time it reaches their system
- Optionally enable and configure the SSL settings
Passive connection method
- Change the following settings
- Enter the address information the peer will need to connect to the data server (this does not have to be an address that will route to a local data server)
- Optionally choose to allow a local data server to associate the transfer with (this
option is mandatory for outgoing transfers in active mode)
- Choose whether to allow any port on the local data server (will usually be required for port translation enabled networks)
5.1.5 Approving or declining the data transfer
- Right click the data transfer in the top list in the main window and select Verdict -> <Accept/Decline> in the popup menu.
5.3 Setting default values
Default values are imported from the sdispatch.conf as the Secure Dispatch initialises. By default it searches for this file in the following directories./ and /etc (UNIX)
.\ (Windows)
sdispatch -f <path-to-config>The format is very basic
property = value # commentFor string values it is best to encase the value in double quotes.
"value"
6 Creating an SSL certificate with OpenSSL
First, create the strong private keyopenssl genrsa -out private.pem 102400Create a self-signed certificate
openssl req -new -x509 -key private.pem -out cacert.pem -days 1095To show information about certificate
openssl x509 -in cacert.pem -textTo only show the certificate hash (required in filename for verification)
openssl x509 -noout -hash -in cacert.pem
7 Colophon
This manual was written by Thomas Pongrac. The text is authored in html and the embedded images were created with the GPL program Dia.
Last updated: 15.06.2009 (dd.mm.yyyy)